Understand dashboards and settings
Account Settings page
To access the Account Settings page of your Apple Search Ads Advanced account, sign in and click your name at the top right of any page. From the menu that appears, click the Settings link.
From the Account Settings page, you can:
-
Create a new Apple Search Ads Advanced account.
-
View a list of your existing Apple Search Ads Advanced accounts.
-
Edit your account settings, including your account information, other users, and payment information (if you’re an Account Admin).
-
Access the Documents page if you’ve added mainland China to a campaign. On this page, you can submit your app and business for approval to run ads in mainland China — and check the status of your request.
-
See your Change History for activity on your account.
Campaigns dashboard
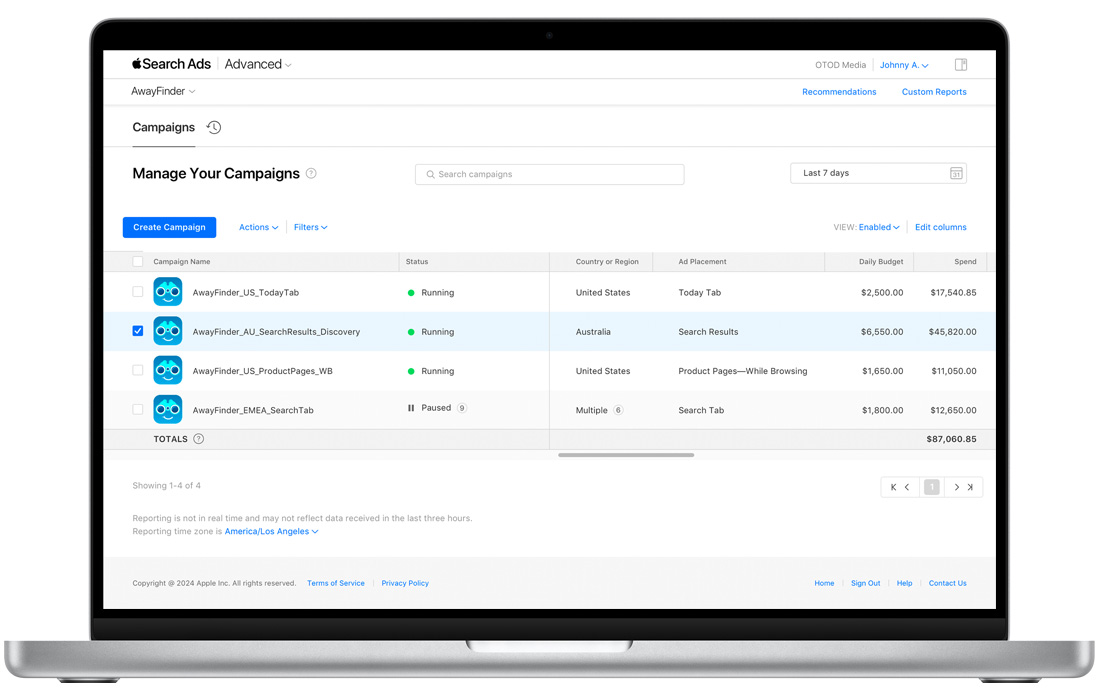
The Campaigns dashboard is the first page you see when you sign in to your Apple Search Ads account. Alternatively, you can access your campaigns list by choosing your account name from the Account menu at the top right of the page.

From the Campaigns dashboard, you can:
-
See a list of your campaigns and campaign history.
-
View all ad groups, keywords, search terms, and negative search terms in your campaign.
-
Filter data according to Countries or Regions, Status, App, Ad Placement, Daily Budget, Spend, Taps, Installs, Impressions, Avg Daily Spend, New Downloads, and Redownloads.
-
Edit your daily budget.
-
Pause, activate, or remove campaigns.
-
Create new campaigns.
Ad Groups dashboard
Ad Groups dashboards display a list of all the ad groups in a campaign. To reach the Ad Groups dashboard, simply click a campaign name on the Campaigns dashboard.
From the Ad Groups dashboard, you can:
-
Manage campaign settings, including daily budget.
-
View a list of ad groups, along with their keywords, search terms, and negative keywords.
-
Filter data according to Status, Default Max CPT Bid, CPA Cap, Spend, Taps, Installs, Impressions, Avg Daily Spend, New Downloads, and Redownloads.
-
Edit keywords and negative keywords.
-
See your ad group change history.
-
View reports.
All Keywords dashboard
You can access a search results campaign’s All Keywords dashboard by clicking the campaign name on the Campaigns dashboard.
From the All Keywords dashboard, you can:
-
See all your keywords and their performance metrics across all your ad groups.
-
See enabled keywords, removed keywords, and all keywords by adjusting the View option on the right-hand side of the screen.
-
View search terms and negative keywords on their respective tabs.
-
Filter data according to Match Type, Max CPT Bid, Spend, Taps, Installs, Impressions, Avg Daily Spend, New Downloads, and Redownloads.
Note that this view doesn’t include search terms that have been matched to your ad by Search Match. For a comprehensive view of search term performance, including Search Match, go to the Search Terms tab.
Search Terms tab
A Search Terms tab is accessible from the All Keywords dashboard in each search results campaign and the Ad Group Keywords dashboard in each ad group. The tab gives you valuable insights into all your keyword and Search Match performance metrics for that particular campaign or ad group. Here, you can do the following:
-
View key metrics and performance, such as search terms that led to impressions, taps, and conversions.
-
Discover the search queries that Search Match has automatically matched to your ads, and view their performance.
-
Filter data according to Match Source, Default Max CPT Bid, Spend, Taps, Installs, Impressions, Avg Daily Spend, New Downloads, and Redownloads.
-
Identify successful Search Match and broad match search terms to add as keywords to one or more ad groups in the same or different campaigns.
-
Learn which Search Match or broad match terms aren’t working, and consider adding them to as negative keywords at the ad group or campaign level, to one or more ad groups or campaigns.
-
Add search terms as keywords or negative keywords by selecting them from the list of terms within the Search Terms tab and choosing your desired action from the Actions menu.
Negative Keywords tab
A Negative Keywords tab is accessible from the All Keywords dashboard in each search results campaign and the Ad Group Keywords dashboard in each ad group. From the Negative Keywords tab, you can:
-
Add more negative keywords to the campaign or specific ad group.
-
Delete negative keywords.
-
Filter data according to Match Type and Type (campaign negative keyword or ad group negative keyword).
Ad Group Keywords dashboard
To get to the Ad Group Keywords dashboard, simply click the name of the search results ad group from the list. Here, you can:
-
Manage all keywords in the ad group and view performance reporting on them.
-
Add keywords, search for more keywords, and view and add recommended keywords.
-
Filter data according to Match Type, Max CPT Bid, Spend, Taps, Installs, Impressions, Avg Daily Spend, New Downloads, and Redownloads.
-
Edit any keyword’s maximum cost-per-tap (max CPT) bid.
-
Edit ad group settings.
Ads dashboard
The Ads dashboard is accessible from the Ad Group Keywords dashboard within search results and Today tab ad groups. Here, you can:
- See current and historical performance data for all of your search results ad variations and Today tab ads.
- Create and remove ad variations and Today tab ads.
- Edit an ad variation’s or a Today tab ad's name.
- Change the status of an ad variation or Today tab ad.
How to customize and filter data in your dashboards
Your Campaigns dashboard will automatically show your campaigns, their statuses, IDs, app name, and a selection of metrics. Your Ad Groups and All Keywords dashboards will show your ad groups, their statuses, IDs, and performance metrics. The Search Terms and Negative Keywords tabs provide additional metrics.
To customize your performance metrics view on any dashboard or tab, click the blue “Edit columns” link on the top right of the table. A drag-and-drop feature lets you move items back and forth between the Hidden section and the Shown section.
To filter the data that appears in your dashboard, click the Filters menu and select from general, performance, and advanced options. You can apply up to 20 filters and save individual and combinations of filters for future use.
How to change the date range of your
performance view
From any dashboard, go to the menu on the right side of the page. There you can choose from date ranges, including Today, Yesterday, Last 7 Days, This Week, Last Week, Last 30 Days, Last 4 Weeks, Last 12 Weeks, This Month, Last Month, and a Custom Range.
How to search by campaign, ad group, and more
Within your main account dashboards, you can use the search field in the middle of the page to find specific campaigns, ad groups, keywords, and more. Simply search for any of the following on the appropriate dashboard or page, and press Return to see the results:
- Campaigns dashboard — Search by campaign name or campaign ID.
- Ad Groups dashboard — Search by ad group name or ad group ID.
- All Keywords dashboard — Search by keyword or keyword ID.
- Ad Group Keywords dashboard — Search by keyword or keyword ID.
- Search Terms tab — Search by search term.
- Negative Keywords tab — Search by negative keyword or keyword ID.
If you have eight or more campaign groups set up in your account, you can also search for specific campaign groups. In the upper left corner of any page, click your campaign group name to open the menu and search field. As you enter a campaign group name or ID in the search field, associated campaign groups will automatically appear in the menu. If you have seven or fewer campaign groups, you’ll simply see a list of them in the menu. The search field won’t appear.
Change History
Your Change History gives you a record of changes to your account, who made the changes, and when.

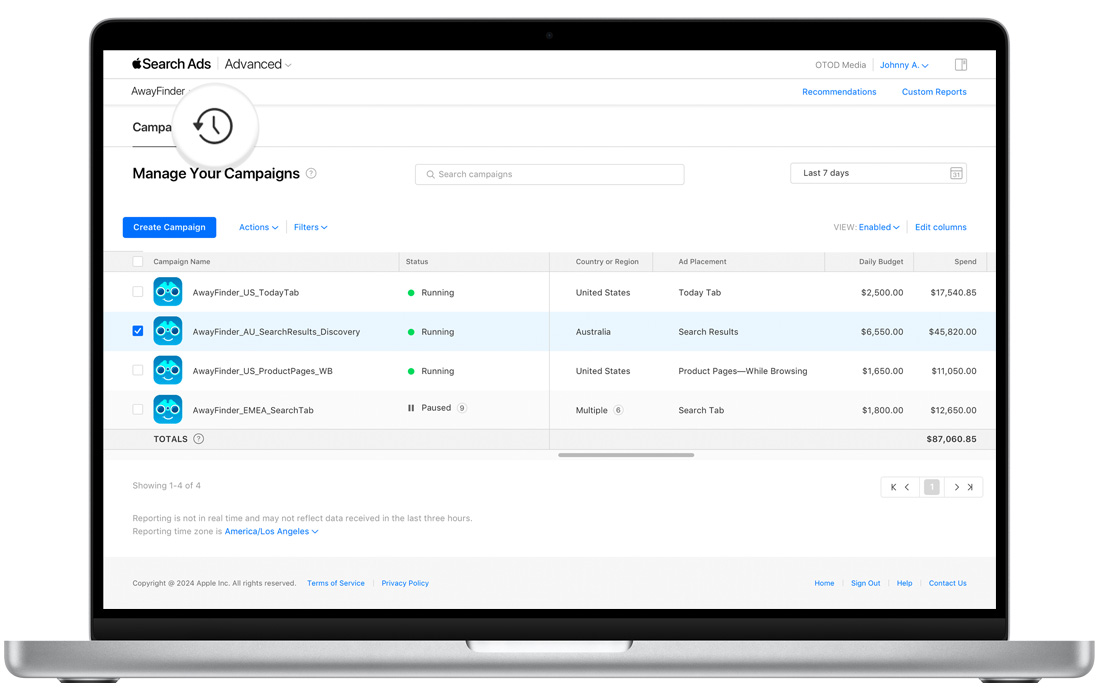
Click the Change History icon from the following pages:
-
Account Settings: Shows your account and campaign group changes, along with changes to API access authorizations.
-
Campaigns dashboard: Shows your changes to each campaign, including campaign settings, ad group, max CPT bid amount, and keyword changes.
-
Ad Groups dashboard: Shows you all changes to your ad group settings, max CPT bids, keywords, negative keywords, and keyword status.
Activity is listed in chronological order, and you can filter by what was changed — account, campaign, ad group, and so on, or the activity — created, added, deleted, and so on. Max CPT bid changes will display both the previous and new bid amounts.
When bulk changes have been made to keywords, negative keywords, or max CPT bids, the first 50 changes are shown on the screen and you have the option to download a spreadsheet listing all changes.
Note that access to Change History depends on user permissions. For example, if you’re a Campaign Group Manager, you’ll only see changes made to your campaign group in the account.